Remove Your Conference Call Background Noise for Free!
As working from home has become the new normal for a lot of professionals during the pandemic, communication over conference calls has posed more of a challenge. I’m not talking about the funny WFH incidents as people and their families are adapting to the new situation. I’m talking about not being able to leverage non-verbal communication as before, which is commonly believed to be responsible for the majority of our communication’s impact.
With fewer communication opportunities and negligible body language visibility, we’re now relying on the clarity of our words and voice more than ever. Having a decent sound setup is no longer just a nice-to-have for those occasional WFH days – it’s become essential.
Having a decent microphone is a good start, but improving your setup doesn’t necessarily have to cost much. In fact, I recently improved my setup a great deal without spending any money by just removing background noise using free software. Let me take you through how I did it:
Walkthrough
-
What makes most of this possible is the amazing (and open-source) OBS Studio which is popular with streamers. Go ahead and install it. While you can do many fancy things with it, we’re going to use its audio filters for our purpose.
-
Another core part of the setup is Virtual Audio Cable, which is also free. While there are OBS plugins available to provide its video as a virtual webcam, there are no equivalent plugins for sound yet. We’re going to use this software to capture the filtered/noiseless OBS audio output and provide it as a virtual microphone that we can use in conferencing software like Teams and Zoom. Go ahead and install this one as well.
-
In OBS Studio’s Audio Mixer, click the settings cog icon next to Mic/Aux and choose
Advanced Audio Properties: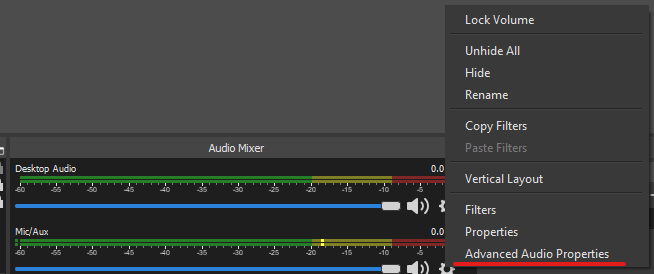
Then set
Audio Monitoringfor your Mic/Aux toMonitor and Output: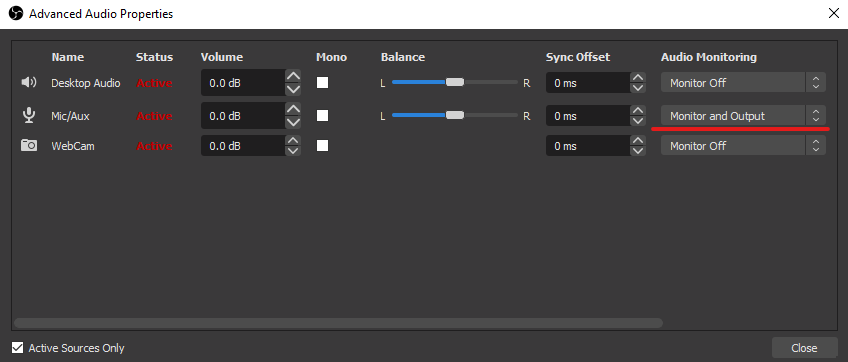
-
Go to the Audio settings tab from
File → Settings → Audioand underAdvanced, setMonitoring DevicetoCABLE Input (VB-Audio Virtual Cable):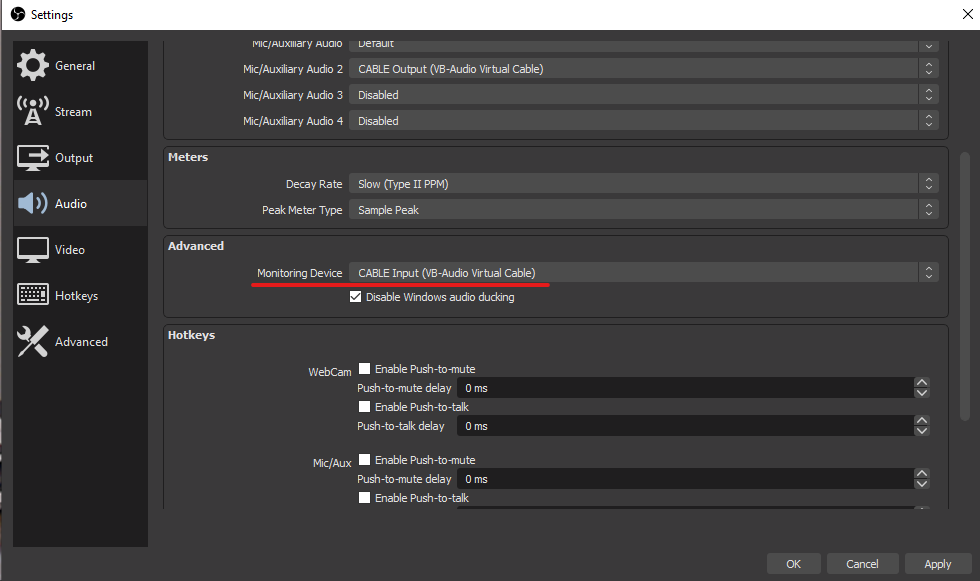
This sends the filtered OBS audio output to the virtual input, which in turn directs it to
CABLE Output (VB-Audio Virtual Cable). -
To make tweaking OBS filters easier, go to sound settings for the
CABLE Outputrecording device in your Control Panel and turn onListen to this device: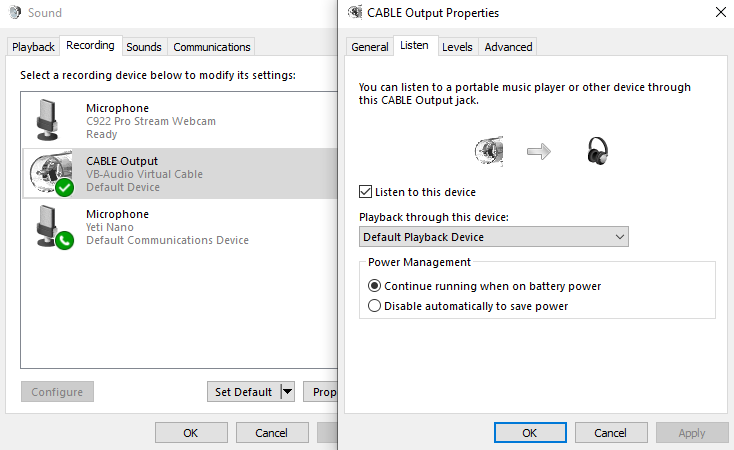
This lets you hear the filtered OBS audio output immediately so you can tweak the filters until you’re happy with the result.
-
You are now ready to tweak the OBS audio filters to remove your background noise. Same as step 3 above, in OBS Studio’s Audio Mixer, click the settings cog icon next to Mic/Aux but this time choose
Filters: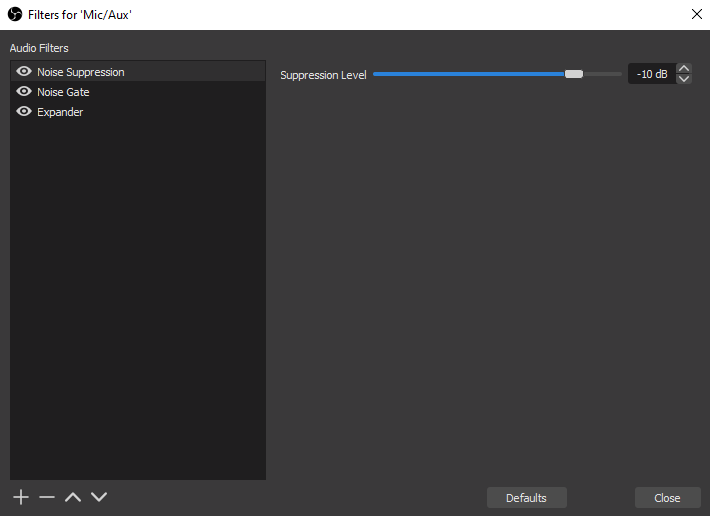
There 3 main audio filters here that’ll help you remove noise and unnecessary sounds:
- Expander is pretty powerful and lets you reduce background noise such as computer fans, mouse/keyboard clicks, breathing, unwanted mouth noises and faint chatter/music. In short, it makes quiet sounds quieter. You typically should place this near the end of your filter chain, but you can sometimes get pretty good results with correctly configuring this filter alone based on your environment.
- Noise Suppression can be used to remove mild background noise or white noise that may be in any of your audio sources (e.g. AC/Computer fan). Start at
-10 dBand move the slider to the left until you don’t hear them anymore. I’ve found this filter can make voice sound a bit high-pitch and artificial, and correctly adjusting an Expander filter produces a better result. - Noise Gate lets you cut your microphone off when you’re not talking. This is helpful when you’re in active conversation, otherwise, it’s much better to just mute yourself when you’re not talking for extended periods. Select a close threshold above the noise volume and an open threshold slightly below your normal talking volume for good results.
Once you’re happy with the results, turn off
Listen to this devicefrom your sound settings. -
Now in your conferencing software like Teams, Zoom, etc. or any other software that uses a microphone, just set your microphone to
CABLE Output (VB-Audio Virtual Cable)and everyone will hear the audio that’s gone through your OBS filters.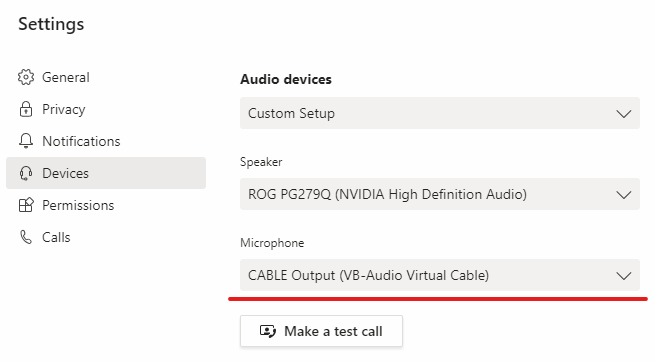
That’s it. There’s no excuse for you to continue sharing the sound of your computer fan, AC and your neighbour’s great taste in music with everyone on the call!

I'm a seasoned software consultant and technologist based in Brisbane, Australia. I've been helping businesses reach their digital ambitions in the fast-paced tech world for about 15 years.
With expertise in people leadership, software architecture and craftsmanship, the Microsoft ecosystem, web technologies, C#, ASP.NET, and Azure, I team up with organisation leaders to bring their visions to life. My passion lies in making a positive impact through technology.
Outside of my profession, you can catch me diving into self-development, breathwork, fitness, travelling, fishing, camping and making random noises with the flamenco guitar.